


Hello
Tutorial, Ubuntu 13.04 Apache2 setup public_html (local sites). This tutorial was done using a fresh install of Ubuntu 13.04.
So what is this good for? Well my use case is that I have been doing more and more web development using Drupal and wanted to be able to create multiple development sites on my laptop. For instance, let say you have a couple of websites, site1.com and site2.net and you want to create a development environment locally on your laptop but under your user account. If your user name is John, you want to be able to put your sites inside your home folder like ~/john/public_html/site1 but then be able to just type the address “site1.local” on your browser to access the site. This makes developing with Drupal and Drush, much easier than trying to access the /var/www directory as a standard user.
What do we need?
- Ubuntu 13.04 installed (don’t see why it would not work on 12.10)
- Apache2
- MySQL
- PHP5
- a pinch of patience…
Next, install Apache2:
sudo apt-get install apache2
Once Apache2 is installed you should be able to type “localhost” in your browser and see the default page similar to the image below: (this page is served from the /var/www directory)

Next, install MySQL Server (Although this is not really needed for the web server set up, it is needed for Drupal development, so may as well install it!)
sudo apt-get install mysql-server mysql-common mysql-client
Next, install PHP5
sudo apt-get install php5-common php5-gd libapache2-mod-auth-mysql php5-mysql apache2-mpm-prefork libapache2-mod-php5 php5 php5-cli
Next, create the public_html directory in your home directory and two site directories.
mkdir ~/public_html
mkdir ~/public_html/site1
mkdir ~/public_html/site2
sudo chmod a+x ~/public_html
This will prevent many “Access Denied” or Permissions errors when trying to access your local sites.
Next we need to apply permissions to the public_html directory for the group www-data.
sudo chown -R www-data:www-data /home/$USER/public_html
sudo chmod -R 775 /home/$USER/public_html
Then add your user account to www-data group
sudo adduser $USER www-data
Note: leaving “$USER” in the command will automatically use your current user account.
RESTART UBUNTU! For the permissions to take affect…
Next, you are going to create some miscellaneous but helpful files. First, in the new public_html directory, create an empty file called index.html and add the following to it, including the asterisks; You can use nautilus for this, just navigate to your home directory and then to public_html, right click and “New Document > Empty Document”
Inside your ~/public_html directory, create a file called index.html and paste the following in it.
***This is your local website server under ~/public_html***
Inside site1 create another index file called index.html and add the following;
***This is your local <b> Site1</b> website server under <b><u>~/public_html</u></b>***
Inside site2 create another index file called index.html and add the following;
***This is your local <b> Site2</b> website server under <b><u>~/public_html</u></b>***
The reason it is good to have these files in place is in order to verify the web server is correctly configured. You should have three files in place for testing;
~/public_html/index.html
~/public_html/site1/index.html
~/public_html/site2/index.html
Next, enable Apache2 userdir module and then restart Apache2
sudo a2enmod userdir

sudo service apache2 restart
By default the user directory module is not enabled in Ubuntu 13.04 and there are some lines that need to be commented out in the php.conf.
Edit the file using gedit:
sudo gedit /etc/apache2/mods-available/php5.conf
Comment out the lines at the bottom as in the image below;

Next, you will actually enable your site1 directory to be served by Apache2!
But first, a synopsis of what we are going to do. Apache2 configuration files are kept in /etc/apache2/ and in the Apache2 directory are two directories specific to this task, one is “sites-available” and the other is “sites-enabled”. Inside sites-available is a default configuration file, this file should not be modified unless you know what you are doing. The default file configures the site located in /var/www. But what we need to do is use it as a template. We will copy the file and rename it. Once we do that, then we have to enable the site so that Apache2 knows there is a new site to look for. When we enable the sites, a symbolic link is added to the sites-enabled directory. Files in the sites-enabled directory should not be modified manually! Always restart Apache2 after making any modifications, otherwise they will not take effect until a reboot.
So let’s get started creating SITE1
sudo cp /etc/apache2/sites-available/default /etc/apache2/sites-available/site1
Next, we need to edit the newly created file and configure it for “site1”.
sudo gedit /etc/apache2/sites-available/site1
- The ServerAdmin can be changed to your email, or one that is for that site or leave it as is.
- Add one line right below the ServerAdmin line:
ServerName site1.local - This will allow the site to be called from the browser window just by typing site1.local
- DocumentRoot needs to be changed to;
DocumentRoot /home/john/public_html/site1 (no trailing slash) - <Directory /var/www needs to be changed to;
<directory /home/john/public_html/site1/ (with trailing slash)
Everything else can be left alone…
Here is the newly created file before and after!


Note: if you wish to have “Clean URL’s” enabled in Drupal, you need to change “AllowOverride None” to “AllowOverride All” and enable the mod_rewrite module by issuing the following command;
sudo a2enmod rewrite

Next, edit the hosts file to reflect the new site1.local entry in the site config file.
Add the following right below the localhost entry, “127.0.0.1 site1.local”
sudo gedit /etc/hosts

Next, enable the site and restart Apache2
sudo a2ensite site1

sudo service apache2 restart
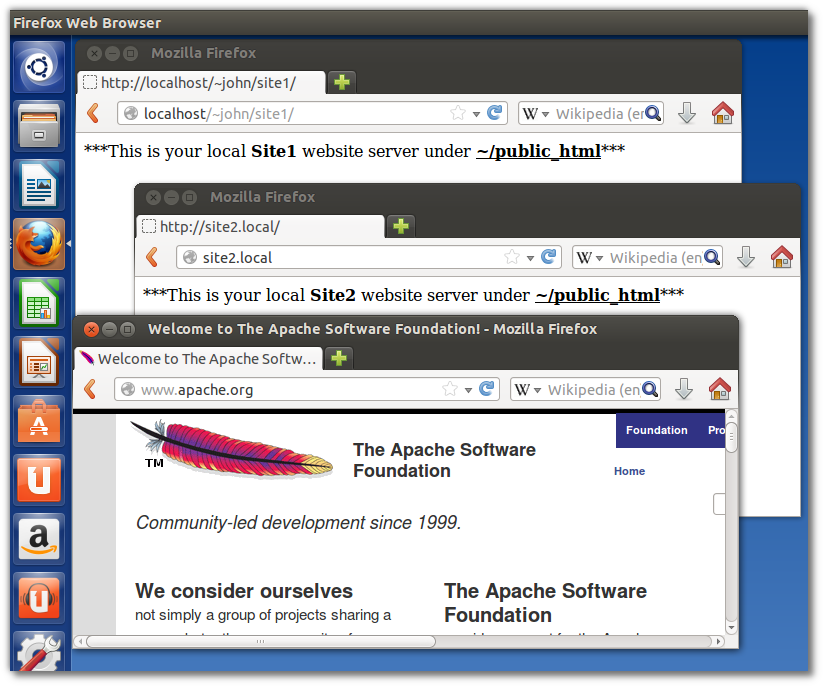
You should now be able to type “site1.local” into your browser and see the message we put in the index.html file in the directory site1.

But you can also access the same site by going to localhost/~john/site1

We can also verify that the ~/public_html directory is being served by just typing localhost/~john

And of course the default localhost site under /var/www is still active.
Now that the system is configured, adding site2 is a breeze!
Here are the steps;
- create new site from template
- add entry to /etc/hosts file
- enable site2
- restart apache2
sudo cp /etc/apache2/sites-available/default /etc/apache2/sites-available/site2

sudo gedit /etc/apache2/sites-available/site2

sudo gedit /etc/hosts
site2 settings 

Enable site2 and restart apache2
sudo a2ensite site2

sudo service apache2 restart
And now the site2.local should be served as well

If anyone catches any typos, please let me know.
Joao
Hi, I followed your instructions and everything went fine, I can view the ***This is your local Site1 website server under ~/public_html***
But when I transfer my php files or other html files, it gives me an error message:
Forbidden
You don’t have permission to access /finalfantasy1development.html on this server.
Apache/2.2.22 (Ubuntu) Server at site1.local Port 80
Did you set the permissions using:
sudo chmod a+x /home/user (replacing “user” with your user name?
If so, perhaps try “sudo chmod a+x /home/public_html”
Do you know if you have the user group “www-data” and if group www-data has access to your public_html directory?
Hi! Thanks for your response, It’s finally working. What I did was this:
sudo chown -R www-data:www-data /home/$USER/public_html
sudo adduser $USER www-data
sudo chmod -R 775 /home/$USER/public_html
After that, I think I messed up everything again, so I tried reinstalling everything. Now it still works fine but the only problem I am having now is my public_html file file has a little lock icon on the folder and I can’t copy or paste to that folder anymore. 🙁
Sorry, I’m very new to this, especially in ubuntu. Been using this OS for less than a week. 😀
Hi Jonathan,
Oh my, just noticed a typo on the path I put in my last post… sorry about that.
Right click on the folder in question, and on the Permissions tab and look at the permissions, should be;
Owner: Me
Access: Create and Delete files
Group: www-data
Access: Create and Delete files
Others:
Access: Access Files
If for some reason the folder is owned by Root, you can use this command to run nautilus as root but be careful, you will have full access to the system!
sudo nautilus
Or you could use the chgrp & chown commands…
sudo chgrp -R www-data ~/public_html
sudo chown -R $USER ~/public_html
I have updated the tutorial to reflect the comments through June 21st, 2013. Thanks to Jonathan for pointing out the permissions issue.
Hi bro, I was able to fix it by reinstalling everything again before I read your response. Now I can start practicing php again. 😀
You’ve been very helpful, I guess messing up is part of learning ubuntu. man took me almost a week to fix this. lol! thanks a bunch!
Hello, great tutorial!!
The only problem I have is that when I go to http://site1.local/dummies I get an error: Forbidden
You don’t have permission to access /dummies/ on this server.
Apache/2.2.22 (Ubuntu) Server at site1.local Port 80
but if I go to http://site1.local/dummies/link.html
everything works fine, what might be the problem ??
I am assuming that “dummies” is a directory. Every directory has to have an index file, “index.html or index.php”, basically a default file that the server can look for when all the user has given is a directory. With “http://site1.local/dummies/link.html” you gave the server a specific file to look for with the just a directory the server looks for “index.html” by default, if it is not there it will give an error.
Joao
Great tutorial…
i follow your instruction but i got this error…. Please how to solve it….. ?????
* Restarting web server apache2 apache2: Could not reliably determine the server’s fully qualified domain name, using 127.0.1.1 for ServerName
… waiting apache2: Could not reliably determine the server’s fully qualified domain name, using 127.0.1.1 for ServerName
that is not an error… it is a warning, because you are not registering the domain for the local sites. It’s normal output.
I installed apache2 and I know that it rubs but when I run the following address, I get nothing! 🙁
http://localhost/
when I see /var/www/ directory there is only one file with the name of “index.html.save”!!!
try restarting apache2. sudo service apache2 restart
For those who upgrade Ubuntu to 13.10 Saucy or has Apache 2.4+ must read this link http://stackoverflow.com/a/19482358/424271
Syntax changes from Apache 2.2 to 2.4
Thanks heaps Jennifer! I upgraded to Ubuntu Saucy, and suddenly, some apache aliases stopped working because of this!
Thanks!
you are doing great job
Gut das wir Windows 7 haben !! Keine Probleme mit Apache !!
Great guide, thanx!
I’d like to set up my system so it works like this, but so that I can also access one or several of the sites online, e.g. by entering the ip/dns adress to my system (or even by setting up a name server). Prefferably with an online/offline switch.
Is this possible? Do you know of some other guide that describes this? I’m quite new to linux..
Niklas, once you have the system configured as above and you want to access the local site remotely you have to configure your access from the internet. What I mean is, you would have to set your router (assuming you are using one) to direct incoming connections to your computer that you have the local site installed. For instance, if your local computer has an IP address of 192.168.1.16, then any computer on your home network can already access it by typing 192.168.1.16/~xxxx/yyyy (xxxx=your user name, yyyy name of your local site). Because your local site is already being served by Apache it is just a matter of accessing your computer from the internet, once you do that, then your system becomes available to whom ever is connecting.
Joao,
Thanks for this tutorial, it was absolutely crystal clear and worked perfectly for me. Many thanks!
Thank you for the kind words Koen, happy to see so many people getting a use out of it. I get almost 100 hits per day from all over the world on that post alone.
Dear/Respected,
I have some problem with apache under Ubuntu, I have linked a video file from my harddrive in test.html file, which is not opening on localhost and other LAN local client while accessing my Ubuntu apache server i.e my ubuntu 192.168.1.69
LAN local user can access my page but they cannot open the video link file which i had linked in my test.html file.
what is the matter ? please help me.
User cannot open access to watch the linked video file in html under ubuntu apache server. please help me.
Regards
Chimi
How i will allow the local lan user to access/open the video linked file under apache on ubuntu in test.html or any other extension .avi/mp4 etc .
Hello Chimiii,
All files served by Apached must reside inside of your directory that you have the site installed in.
If you are using your /var/www as your site, them all files must reside inside that directory. If you are using the /home//public_html for your site, then all of your files must be in that folder.
In other words, what ever is your web document folder, all files that you will be accessing must reside in that folder.
It is a permissions issue and it should be that way.
Hope this helps…
thank you so much
I am running Ubuntu 14.04 and this doesn’t appear to be compatible with new Apache set-up where the main conf file has almost nothing and the conf is done in conf-available. I had to add a “public.conf” that defined the directory /home/*/public_html Thats what got things working on my box.
Also as somebody already pointed-out this uses the old syntax and you need to follow the poster’s link to see the proper working of the directives.
Hi John, as Jeniffer noted above with Ubuntu 13.10, Apache 2.4 was introduced and a different configuration along with it. This tutorial was created in July of 2013, before the release of Ubuntu 13.10.
Joao
Can you update your tutorial to be compatible with Ubuntu 14.04 and beyond which uses apache2 ver. 2.4+?